
Overview
CloudStore makes it possible to
- Save data and media files to a secure online location
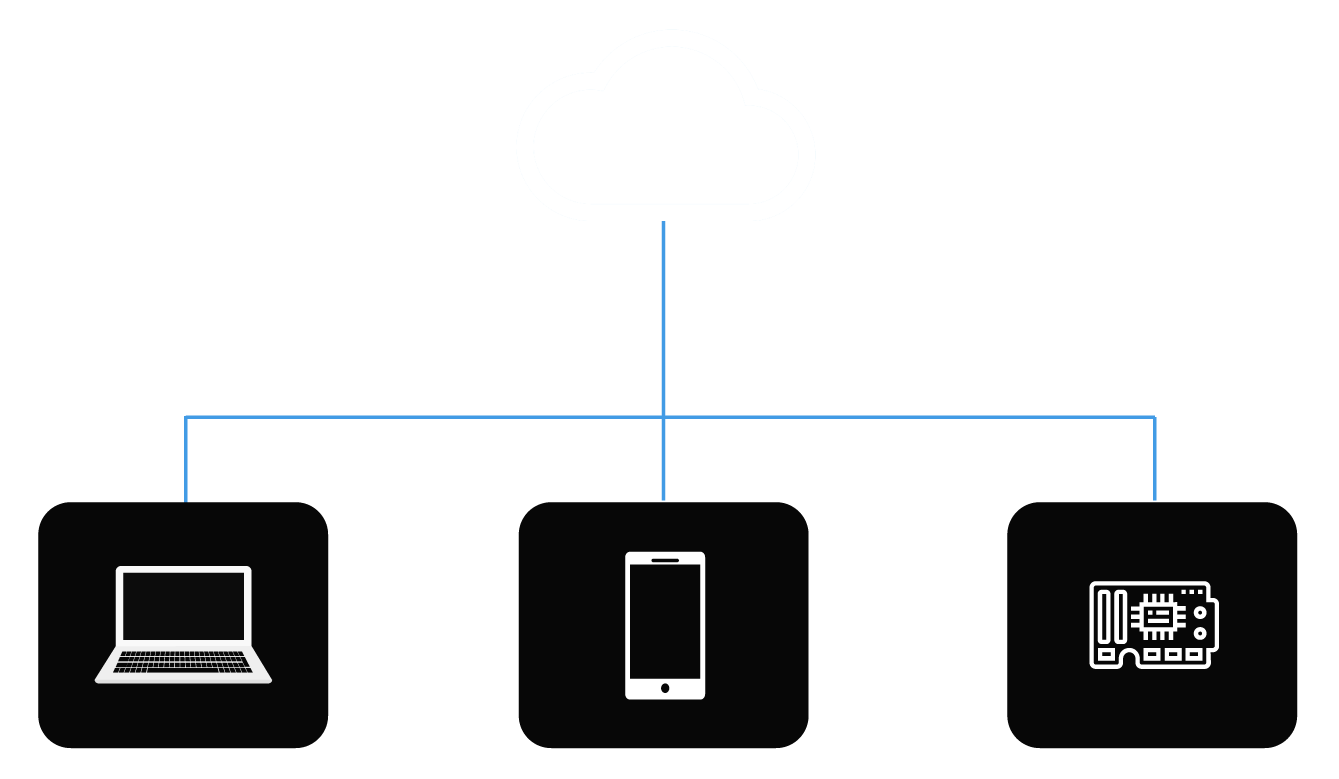
- Keep your data persistent across devices and apps
- Keep your data safe with password protection and unguessable file paths
Including CloudStore
The are 2 ways to include CloudStore into your project
1. Direct link to our CDN version
You can link directly to the latest version by adding the following script tag inside your head tags:
<script src="https://cdn.jsdelivr.net/gh/enjine-io/cloudstore@main/cloudstore.min.js"></script>
2. Download and use locally
You can download the latest version of the CloudStore script from the enjine.io GitHub repo at https://github.com/enjine-io/cloudstore https://cdn.jsdelivr.net/gh/enjine-io/cloudstore@main/cloudstore.min.js
Once downloaded, copy the script to your project directory and add it to your html file inside the head tags:
<script src="<PATH_TO_YOUR_FILE>/cloudstore.min.js"></script>
Initializing CloudStore
Before you can use CloudStore in your project you need to initialize it like this:
javascript
new CloudStore( key, server, options )
Query Parameters
| Parameter | Required | Description |
|---|---|---|
| key | yes | A string id to identify the data to store. This value is case sensitive. |
| server | no | The name of the server. You can send null as the value. |
| options | no | The options parameter is an object where you can pass global passwords for accessing either the Data files or Media files in the cloudstore. The passwords must be set in the CloudStore dashboard. |
Below is an example:
var options = { dataPass: "bingo", mediaPass: "bobbo" };
const cloud = new CloudStore( "<YOUR_CLOUDSTORE_KEY>", null, options )
Data
Saving data
cloud.save( key, value, callback, password )
Query Parameters
| Parameter | Required | Description |
|---|---|---|
| key | yes | A string id to identify the data to store. This value is case sensitive. |
| value | yes | The data to store. You can store a string, integer, or even pass a JavaScript object. |
| callback | no | A function that returns a response object: response. If response.error is null, you can access the data through response.data. |
| password | no | Password to write over the data file if already exists (Passwords are set in the CloudStore admin dashboard). If a password has been set and you do not pass the correct value, you will get an error. |
Example
//Save some data.
cloud.save( "Shopping_List", {"Apples":8,"Oranges":6}, onSave )

//Handle the response.
function onSave( response )
{
    if( response.error ) console.log( "Error: " + response.error + ", " + response.message )
    else console.log( response.message )
}
Loading data
cloud.load( key, callback, password )
Query Parameters
| Parameter | Required | Description |
|---|---|---|
| key | yes | A string id to identify the data to store. This value is case sensitive. |
| callback | no | A function that returns a response object: response. If response.error is null, you can access the data through response.data. |
| password | no | Password to access the data file (Passwords are set in the CloudStore admin dashboard). If a password has been set and you do not pass the correct value, you will get an error. |
Example
//Load some data.
cloud.load( "Shopping_List", onLoad )

//Handle the response.
function onLoad( response )
{
    if( response.error ) console.error( "Error: " + response.error + ", " + response.message )
    else console.log( JSON.stringify(response.data) )
}
Merging data
cloud.merge( key, value, callback, password )
The Merge function allows you to merge and update existing data objects. If the data object you are trying to merge with does not exist, it will create a new object.
The function recursively merges values passed from the source object, replacing existing data and adding new data. It will also recursively merge arrays.
| Parameter | Required | Description |
|---|---|---|
| key | yes | A string id to identify the data to merge |
| value | yes | A JavaScript data object containing the data you want to merge with the source object. If no source object exists, a new object will be created |
| callback | no | A function that returns a response object: response. If response.error is null, you can access the data through response.data. |
| password | no | Password to access data file if one is set |
Example
App 1
// Save some data.
cloud.save( "Shopping_List", {"Apples":8,"Oranges":6}, onSave )

function onSave( response )
{
    if( response.error ) console.log( "Error: " + response.error + ", " + response.message )
    else console.log( response.message )
}
App 2
// Update our Shopping List by adding a new item and changing existing items.
cloud.merge( "Shopping_List", {"Apples":8,"Oranges":10,"Bananas":8}, onMerge )

// Handle the response.
function onMerge( response )
{
    if( response.error ) console.log( "Error: " + response.error + ", " + response.message )
    else {
        // Data merged successfully
        console.log( response.message )

        // Lets now reload the data to see if our object has changed
        cloud.load( "Shopping_List", onLoad )
    }
}

// Handle the response.
function onLoad( response )
{
    // You should now see your new Shopping_List with 10 Oranges and 8 Bananas
    if( response.error ) console.error( "Error: " + response.error + ", " + response.message )
    else console.log( JSON.stringify(response.data) )
}
Listing Data Files
cloud.list( filter, callback )
The List function allows you to get a comma separated list of all your data files that match the filter.
For example, if you had two data files with the keys "steve1" and "steve2" and called the List function like this:
cloud.list( "steve", callback )
You would get back a comma separated string that looked like this: "steve1,steve2".
| Parameter | Required | Description |
|---|---|---|
| filter | yes | A string containing the word you want to search for. This is case sensitive. If you pass and empty string "", it will return all your data files. |
| callback | yes | A function that returns a response object: response. If response.error is null, you can access the data through response.data. |
Example
cloud.list( "Shopping", onList )

//Handle the response.
function onList( response )
{
    if( response.error ) console.log( "Error: " + response.error + ", " + response.message )
    else console.log( response.data )
    //
}
Deleting data
cloud.delete( key, callback, password )
The Delete function allows you to delete existing data objects from the CloudStore.
You delete cloudstore objects by sending the id of the item you wish to remove. If you try removing an object that does not exist, it will return with an error NoFile.
| Parameter | Required | Description |
|---|---|---|
| key | yes | A string id to identify the data store to delete. This is case sensitive. |
| callback | no | A function that returns a response object: response. If response.error is null, you can access the data through response.data. |
| password | no | The value for the edit password set in the CloudStore admin dashboard |
Example
cloud.delete( "Shopping_List", onDelete )

//Handle the response.
function onDelete( response )
{
    if( response.error ) console.log( "Error: " + response.error + ", " + response.message )
    else console.log( response.message )
}
Password Protection
You can control read and write access to your data files by setting a password to each file in the CloudStore admin dashboard.
To see an example of this in action please see the section Dashboard below.
Media
CloudStore allows you to store media files (text and image files) in the cloud so they can be accessed across multiple apps and stay persistent event when your app is removed from your device.
Upload
cloud.upload( data, filename, type, callback, password )
The Upload function allows you to upload a file to the cloud. You can set permissions for editing files in the admin dashboard
| Parameter | Required | Description |
|---|---|---|
| data | yes | A base64 formatted string OR a file in a blob format. |
| filename | yes | The filename you want it stored as. This will be case sensitive when reading. Do not use spaces in your filenames. |
| type | no | The file type being uploaded (e.g. "image/jpg" or "text") |
| callback | no | A function that returns a response object. If response.error is null, response.data will return a json string with 'name', 'folder', 'id', 'mimetype' and 'size'. |
| password | no | A password if one has been set in the admin dashboard |
Example
// Let's assume you want to upload an image to the CloudStore
// You must upload images as a string in a format such as base64
cloud.upload( file_data, "jazz3.jpg", "image/jpg", onUpload )

function onUpload( response )
{
    if( response.error ) console.log( "Error: " + response.error + ", " + response.message )
    else console.log( response.data )
}
File Location
You can copy the full path to your file in the CloudStore admin dashboard. For more information on this read the section on Media Files below.
Password Protection
You can control edit access to your media files by setting a password to each file in the CloudStore admin dashboard.
If a password has been set on a media file then you must include the password as the final parameter in the Upload function call.
An example can be seen in the following section.
Dashboard
Loading
- Navigate to https://enjine.cloud/cloudstore/admin.html
- Log in using your Username and Password - Passwords are auto generated and are sent to you via email
- You should now be at the enjine.io dashboard
User Info
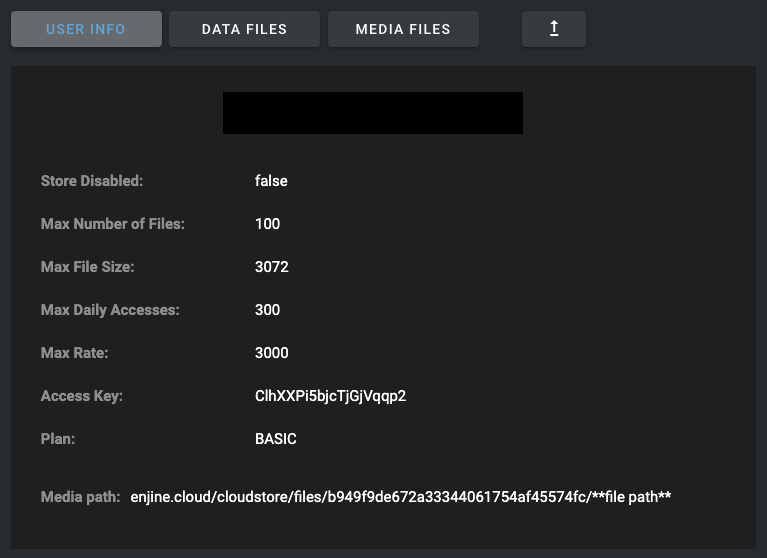
The user info panel displays all your configuration data including your API key and Media path to access your media files
Data Files
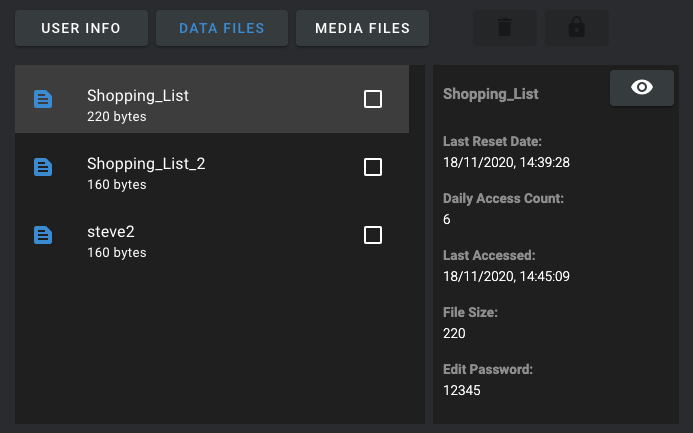
The data files panel displays all your uploaded data files. If you click on the names of the files, you will see information on usage and size appear in the panel to the right of the list.
Password Protection
It is possible to control view and edit access to data files inside the admin dashboard.
To the right of each file is a checkbox. Select a checkbox and you will see the delete and padlock icons highlighted.
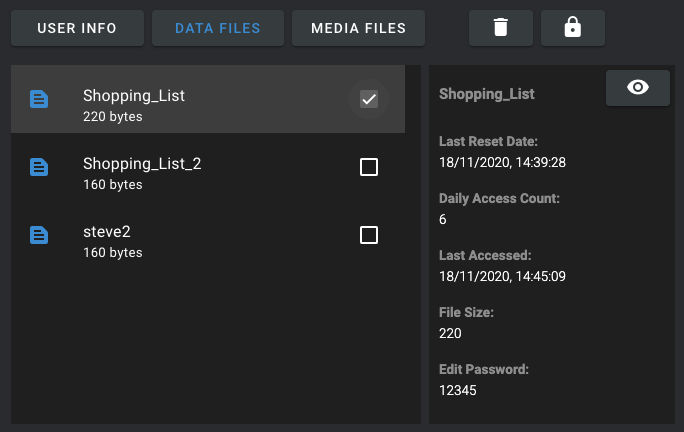
If you press the padlock icon you will see a dialog box appear allowing you to set a password for view or edit access to all selected files
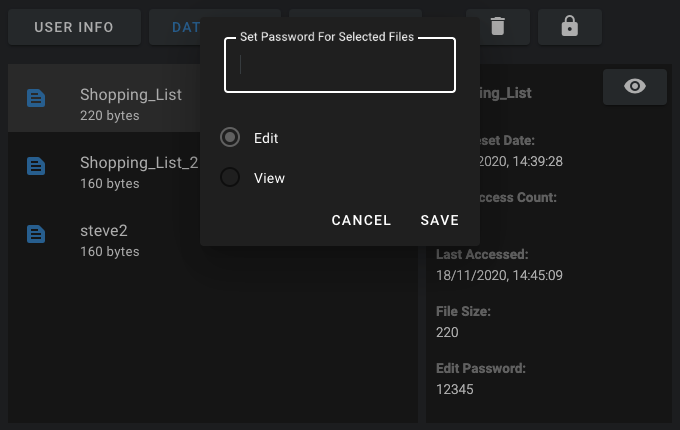
Set the password to enable edit control. Now you will need to pass this password as the final parameter when using the Merge or Save functions.
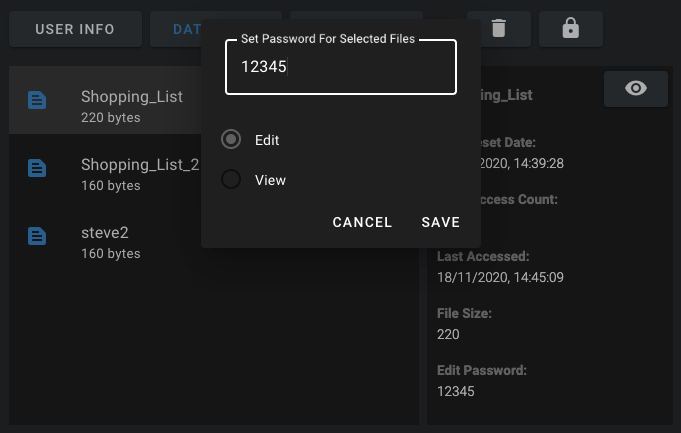
Example
Here we set an edit password to our Shopping_List data file
Now let's see what happens if we try merging new items into our shopping list without appending the password to our Merge function
function btnMerge_OnTouch()
{
    cloud.merge( "Shopping_List", { plums:5 }, onMerge )
}

function onMerge( response )
{
    if( response.error ) console.error( "Error: " + response.error + ", " + response.message )
    else console.log( JSON.stringify(response.data) )
}
If you try to run the code above you will get the following response in response.error: Locked.
Now let's send the correct password as the final parameter in the Merge function like so:
function btnMerge_OnTouch()
{
    cloud.merge( "Shopping_List", { plums:5 }, onMerge, "12345" )
}

function onMerge( response )
{
    if( response.error ) console.log( "Error: " + response.error + ", " + response.message )
    else console.log( JSON.stringify(response.data) )
}
If you now run this code you will see the message Entry saved.
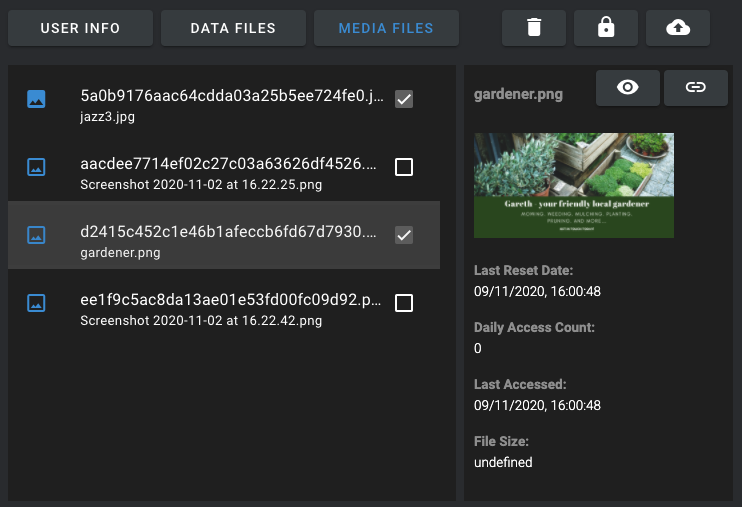
Media Files
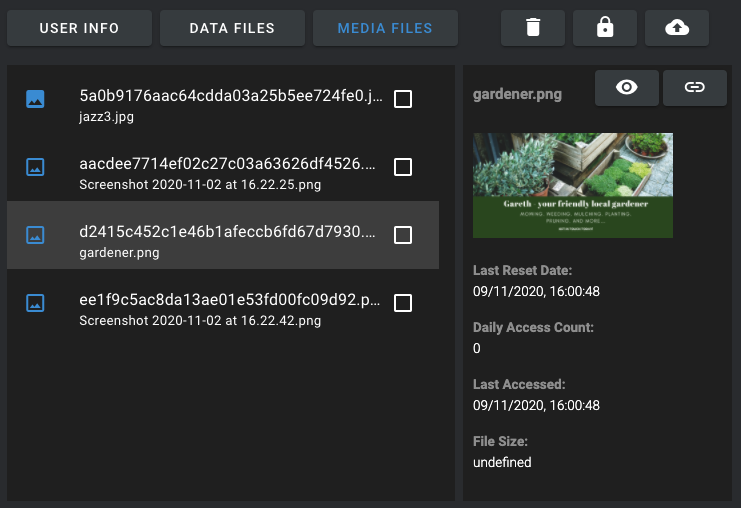
The media files panel lists all your uploaded media files. Like the data files panel, if you click on the filenames it will show you details about the uploaded file including a preview snapshot of the file if it's an image file.
File Location
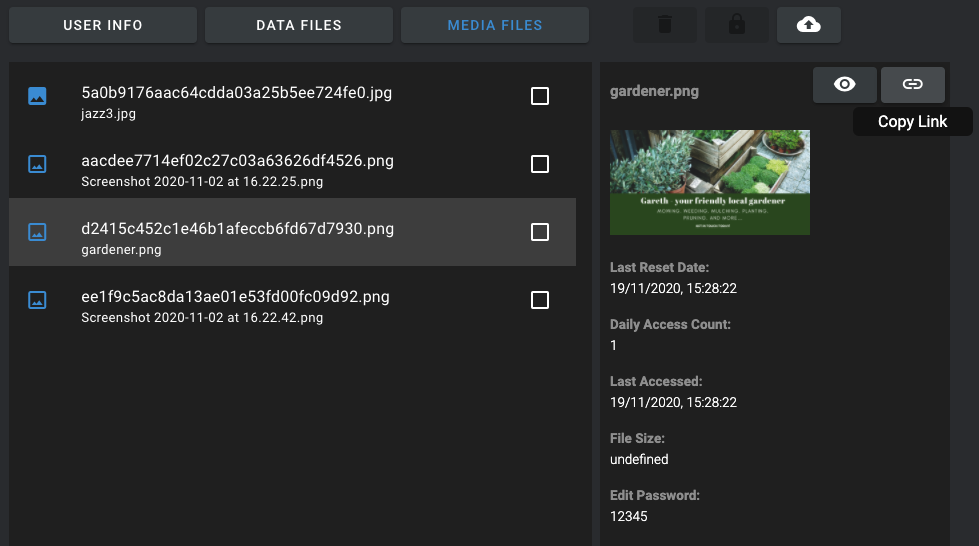
To find the full path of your media file simply highlight your file and press the copy link button in the right panel.
Password Protection
It is possible to control edit access to files uploaded to the CloudStore dashboard.
To the right of each file is a checkbox. If you select one or more files using the checkboxes you will see the delete and padlock icons highlighted.
If you press the padlock icon you will see a dialog box appear allowing you to set a password for edit access to all selected files
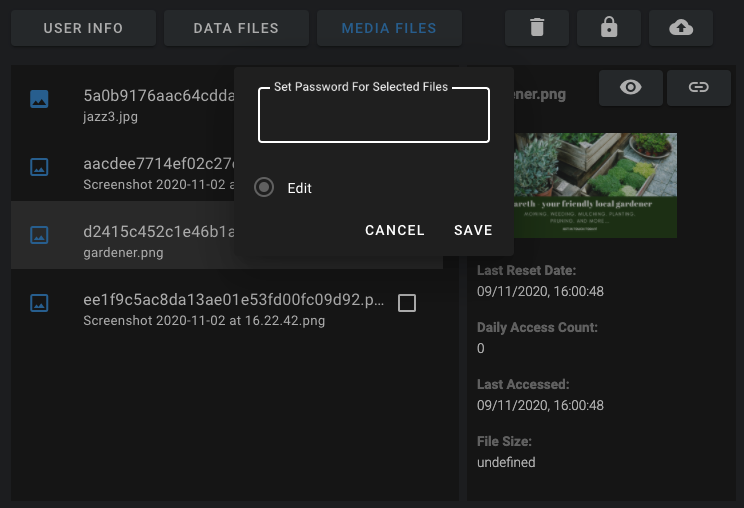
Set the password to enable edit control. Now whenever a user tries to edit this file they will need to pass along the password to each function call.
Example
We want to protect our uploaded file "jazz3.jpg" from being overwritten by unauthroised users.
To do this we: - Assign a password to the file using our admin dashboard - Now whenever we want to override the file, we must include the password as our final parameter in the Upload function
For thie example we have assigned the password as 12345
// Let's assume you want to upload an image to the CloudStore
// You must upload images as a string in a format such as base64
cloud.upload( file_data, "jazz3.jpg", "image/jpg", onUpload, "12345" )

function onUpload( response )
{
    if( response.error ) console.error( "Error: " + response.error + ", " + response.message )
    else console.log( response.data )
}
If you run this code you should get a response back with the messsage: File Uploaded
You can see you uploaded file in your using our admin dashboard